Open topic with navigation
Keystone/QuickBooks Direct Posting Setup
You will need to set up each computer where you want Keystone to have access to QuickBooks.
If you have previously installed the Keystone to QuickBooks interface, even if it was an earlier version of QuickBooks, you will need to uninstall the Keystone interface in QuickBooks before you install the new one. See Uninstall Keystone Interface in QuickBooks Instructions below for instructions.
To install the QuickBooks interface
- Download the QuickBooks Setup file from the MoreThanData web site.
Go to http://morethandata.org/product-downloads/, log in, and choose "Keystone QuickBooks Setup", and follow the instructions from there to download it and save it to your computer.
- Right-click the file you just downloaded (the filename will end in QB_Setup.zip), and choose to extract all the contents of this zip file.
This will create a folder with the contents of the zip file in it.
- Open this folder, double-click the file QBFC10_0Installer.exe, and follow the installation instructions.
To set up Keystone to use QuickBooks
- Open the Tools tab in the Keystone ribbon and click Options.
The Options screen appears.
- Select the QuickBooks tab.
- Set the Connection mode for your computer.
- If your computer will not be using QuickBooks, select None.
- If you will be using Keystone with a copy of QuickBooks installed on the same computer, select Local.
- If you will be using Keystone with a copy of QuickBooks located on a different computer on your network, select Remote. For more information, see the Keystone/QuickBooks Remote Data Sharing section.
- The first time you make a connection from Keystone on any computer to QuickBooks, QuickBooks needs to be open and in Administrator mode. If you are using the Multi-user version of QuickBooks, it needs to be set to Single-user mode.
- Then in Keystone, open the Tools tab in the Keystone ribbon and click Affiliate Setup.
The Affiliate Setup screen appears.
- Select the QuickBooks tab.
- Click the Browse button and locate the company file that QuickBooks is using.
- Enter the name of the QuickBooks accounts you want Keystone to use.
Use only the names and not the numbers. Only enter the accounts you are prepared to use.
For example: if you are only prepared to use Keystone Direct Posting for mortgage payments, only enter the QuickBooks mortgage accounts in the Mortgage And Closing Fees pane that you have previously created in QuickBooks. For more information, see Setting up Required Affiliate QuickBooks Accounts. If any of your entries are sub-accounts, enter the parent name followed by a colon, and then the sub-account name, with no spaces in between.
- Click the Validate QuickBooks Connection and Accounts button to test the connection to QuickBooks.
Newer versions of QuickBooks will identify “Keystone” as the application that is requesting access to QuickBooks. Older versions will identify “msaccess” as the application requesting access.
QuickBooks will display the question Do you want to allow access to this company file? Answer by clicking the button Yes, Always.
Next Keystone validates that it has access to the QuickBooks accounts you have defined. If it is successful, it will display a message to that effect. If you add or modify your QuickBooks account definitions in Affiliate Setup later, you should run this verification again.
If at any time you want to verify that the Keystone connection to QuickBooks is working, go to Affiliate Setup and click the Validate QuickBooks Connection and Accounts button. This is the easiest way to verify the connection.
- Click the Initialize Keystone Data button. Select those payments you want to initialize.
This will set all the Keystone payments you have selected to having been posted so that only future payments of this type will be considered for posting.
If you have initialized a set of payments in the past and have been posting these payments since that initialization, you should not reinitialize this set of payments a second time. This may set some of these payments as posted when they haven’t been.
- Keystone will have to be restarted for these changes to take effect. Close Keystone.
- Go to QuickBooks and choose Edit > Preferences.
- On the Preferences screen, click the Integrated Applications button and select the Company Preferences tab.
On newer versions of QuickBooks, “Keystone” will be shown as the Application Name. On older versions, “msaccess” will be identified as the Application Name.
Each computer with Keystone that will be requesting access to the QuickBooks company file will add an entry to this table. The Access Rights for each of these entries will need to be set.
You may want to create a separate login name for Keystone.
- Click the Properties button and set the Access Rights to Allow the application to access this company file and Allow this application to login automatically, then select the name you want Keystone to log in as.
- Click OK to close this screen, and click OK again to close the Preferences screen.
This completes the Keystone/QuickBooks Interface setup.
To uninstall the Keystone interface in QuickBooks
If you have installed any previous Keystone to QuickBooks interface, you must remove it in QuickBooks first before you can install the new interface.
- Open your copy of QuickBooks in Administrative mode.
This opens QuickBooks in single-user mode. Leave it in this mode.
- Choose Preferences from the Edit menu.
- Select Integrated Applications.
- Select the Company Preferences tab
If the MTD Keystone interface has been previously installed, it will show up in the QuickBooks Company Preferences screen as shown below.
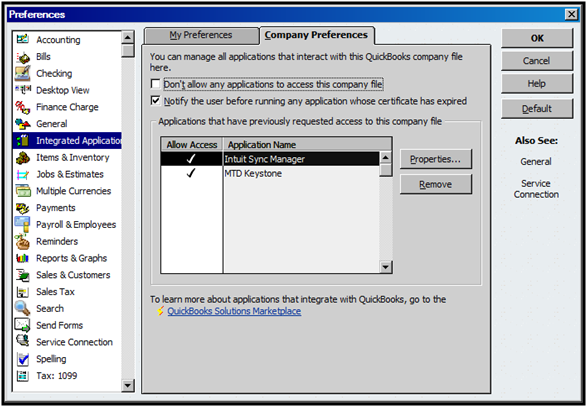
- Click on the MTD Keystone entry, which will select it, then click the Remove button.
- Click OK.
You can now install the new Keystone to QuickBooks interface. See To install the QuickBooks interface above.